In the course of doing ultrasound training all over the country, I have been surprised to learn that equipment companies have been slow to accommodate the need for ultrasound troughs and tables for veterinarians. Patient comfort during an exam makes everything go more smoothly. And, yes, you can always perform an exam with the patient in lateral recumbency, but you are still going to re-position multiple if you are thorough.
Many veterinarians use x-ray positioning troughs for ultrasound: x-ray troughs were designed to hold a patient in position for a short time; they are too deep, too short, and too uncomfortable to maintain a patient in position for 15-20 minutes or longer.
We have made our own troughs from foam wedges covered with nylon pack cloth. We use foam wedges that are standard cut and alter them to fit exam tables. Our most commonly used wedge is 36” long, 16” wide, and 8” tall. This size fits most exam tables in most clinics and since my practice is mobile, this is the trough we carry with us. If your exam table can accommodate a longer trough, make yours longer. If you are interested in making your own, tap one of your creative staff members or a family member and show that person the following:
To make an abdominal wedge V-trough support cushion for abdominal ultrasound patients you’ll need:
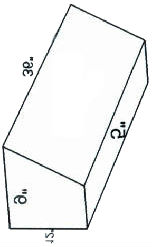
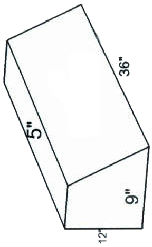
1. At least 2 foam wedges 5 x 9 x 12 x 36” (3 if you would like to make your trough longer) order from: http://www.foamforyou.com/back_support_wedges.htm#Back Bolsters if you don’t have a good source near you
2. Foam glue (spray can)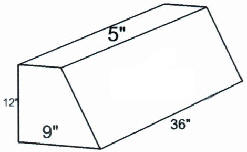
3. Cutting tool: I like an electric knife if you can find one
4. Sharpie and yardstick
The wedge is going to be 16-18” wide depending on your exam table. The 12” side of the wedge is the base. Using your yardstick and sharpie, draw a line 3.5 or 4 inchs from the 5” face to the angled face on both ends of both wedges. Then connect the points on the the flat face and angled face. Using the electric knife cut along the lines. Now you have 4 wedges: 2 8 X 9 X 36” wedges and 2 4 X 7 (about) X 36” (keep the smaller pieces to make 1 or 2 smaller troughs for small dogs and cats)
Using the spray foam glue, follow the manufacturer’s instructions and glue the narrower faces of the two large wedges together to form a trough. Glue the two smaller pieces together, as well.
5. Now you have two troughs. Use large garbage bags to wrap your troughs before covering for waterproofing (I know people who stop here and simply cover the garbage bag wrapped foam with towels!)
IF you want to make a cover:
1. Nylon pack cloth or other densely woven, water resistant fabric
2. Heavy duty thread
3. 1.5 yards sew on 2” velcro (don’t use self stick velcro)
4. Sewing machine
5. Butcher paper to make a pattern
6. Someone who understands how to make a pattern, cut and sew!